How To Use ZOOM in a UBCO Classroom - Resource Guide
UBCO Classroom Zoom instructions
For those looking to use Zoom to stream or record their class from a UBCO classroom.
Two Sections: Part A - Small Classrooms and Part B - Large Classrooms
Part A - Small Classrooms
To see this information in video form, please see “Small Classroom Zoom and Recording Overview”
I - Initial connection of laptop to room projector system
- Use the wall panel to turn on the projector; select the HDMI input.
- Plug the HDMI cable into your laptop so that you can show materials on the projector.
- Plug the Room AV USB cable into your laptop to connect to the room camera and microphone.
- Check that your laptop audio is set to use the classroom speakers through the HDMI cable. This is essential to hear your students on Zoom.
- Mac: click on the speaker icon (computer volume button) at the top right of your screen; select the in-room speakers, most likely called Crestron In-Room audio
- PC: click on the speaker icon (computer volume button) at the bottom right of your screen; click on the text in the window that opens and select the in-room speakers, most likely called Crestron In-Room audio.
- Start your Zoom Meeting and choose “Connect to computer audio” when the option is shown.
II - Getting Zoom Ready: Select the Camera in Zoom
- Each lectern will have a sign listing the room’s equipment. Example:

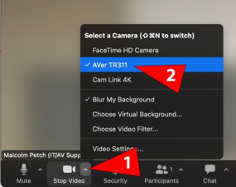
- In Zoom, adjust your video settings by clicking on the up arrow beside the Stop Video button at the bottom left of the Zoom window 1 – this will open the video preferences.
- Select the camera that matches the lectern equipment sign 2 (Example: AVer TR311). The room camera in the room can follow you at the whiteboard or front of the room.
III - Getting Zoom Ready: Select the Audio Setting in Zoom
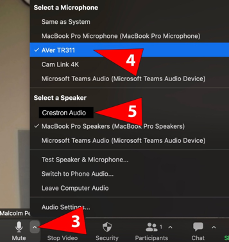
- For audio, click the up arrow beside the Mute button at the bottom left of your Zoom window 3
- Under Select a Microphone, choose the microphone that matches the lectern equipment sign 4 (Example: AVer TR311).
- Under Select a Speaker, choose the speaker that matches the lectern equipment sign 5 (Example: Crestron Audio).
- If you have students already connected to Zoom, ask them to speak to ensure you can hear them in the room; check that they can hear you, too.
Part B - Large Classrooms
In large classrooms there are two options for hosting or recording a class on Zoom: use the Room system with Zoom on the built-in Lectern PC, or use the Room system with Zoom on your Laptop.
Option One – use Zoom on the Lectern PC
I - Initial configuration of the Room Projector system
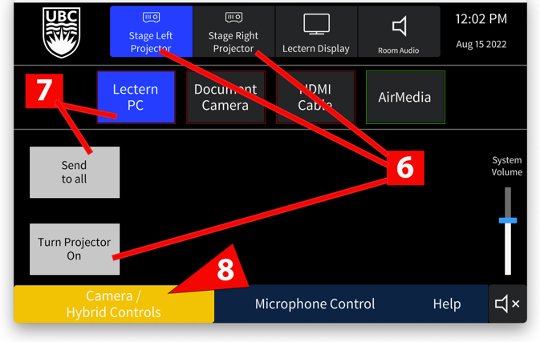
- Use the room control touch panel to turn on the projector or projectors 6
- Prepare your teaching materials on the computer in the lectern, the document camera, and so on.
- Note: the second lectern monitor only powers on when the room is in Dual Delivery mode.
- For further details on using the large classroom projection system, please see “How to connect to the large size classrooms at UBCO”
- On the lectern PC, use the Canvas shortcut or the Chrome browser to sign in to your Canvas profile where you’ve already got your Zoom class scheduled (or simply sign in to Zoom on the lectern PC).
- On the room control touch panel, assign the lectern PC to the projectors 7
- On the room control touch panel, select the yellow Camera/Hybrid Controls button in the lower left of the window 8 . This opens a control page that will allow you to use the room system (camera, microphones, content sources) in your Zoom recording or online class.
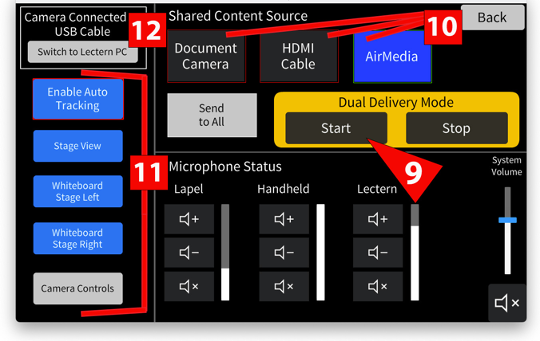
- To connect the room camera and microphone to your Zoom session, press the Start button in the yellow Dual Delivery Mode window 9 . The second monitor will come on.
- Start your Zoom Meeting on the lectern PC.
- The Camera and Audio settings in Zoom should be pre-configured. To check the settings, please follow the steps in sections II and III of the instructions for Small Classrooms.


II - Running your Zoom class on the Room projector system
Once the room system is configured, running your class in Zoom is much like being in a Zoom meeting and sharing content, which you may have experience with already.
- To share your PowerPoint or other computer content in the Zoom call, click on the green Share Screen button at the bottom of the Zoom window and choose from among the options that show up. Note that anything on monitor two cannot be shown on the room projectors.
- Remember to select “Share sound” and “Optimize for video” if you have any videos as part of your presentation.
- To share content from the Document Camera or from a laptop or tablet connected to the HDMI cable or AirMedia, click on the green Share Screen button at the bottom of the Zoom window – EXCEPT this time go to the “Advanced” tab in the sharing menu that opens up. Click on “Content from second camera”.
- Now, on the room control touch panel, choose the source you want to share in the Zoom call from among the options at the top of the control panel 10
- Choose Send to All to have your selected content source be shared on the projectors as well as in the Zoom call.
- Note: AirMedia is UBCO’s wireless presentation system through which you or anyone in the room can use a device to share content on the projector and through Zoom. For information on how to use AirMedia, please see our video entitled “UBCO wireless presentation system”.
- To control the classroom camera, use the buttons on the left side of the control panel 11
Option Two – use Zoom on your laptop
I - Initial configuration of the Room projector system
- Use the room control touch panel to turn on the projector or projectors 6
- Connect the HDMI cable to your laptop and assign the HDMI to one or both projectors using the room control panel (or use AirMedia to connect your laptop).
- Connect the Room AV USB cable to your laptop to connect the room camera and microphones to your laptop.
- On the room control touch panel, select the yellow Camera/Hybrid Controls button in the lower left of the window 8
- Check that the control panel says the Camera is connected to the USB cable 12
- If it says “Camera Connected to Lectern PC”, hit the grey button 12 to switch it to the USB cable.
Check your camera and audio settings in Zoom, if needed, by following the steps in sections II and III of the instructions for Small Classrooms.
II - Running your Zoom class on your laptop with the Room camera and microphone
Once your laptop is configured, running your class in Zoom is much like being in a Zoom meeting and sharing content, which you may have experience with already.
- To share your PowerPoint or other presentation from your laptop in the Zoom call, click on the green Share Screen button at the bottom of the Zoom window and choose from among the options that show up.
- Remember to select “Share sound” and “Optimize for video” if you have any videos as part of your presentation.
- To share content from the Document Camera, click on the green Share Screen button at the bottom of the Zoom window – EXCEPT this time go to the “Advanced” tab in the sharing menu that opens up. Click on “Content from second camera”.
- Now, on the room control touch panel, choose the Document Camera as source you want to share in the Zoom call from among the options at the top of the control panel 10
- Choose Send to All to have your selected content source be shared on the projectors as well as in the Zoom call.
- To control the classroom camera, use the buttons on the left side of the control panel 11
Article ID: 1222
Created On: Tue, Aug 23, 2022 at 9:25 AM
Last Updated On: Tue, Aug 23, 2022 at 9:25 AM
Authored by: Malcolm Petch
Online URL: https://knowit.ok.ubc.ca/article/how-to-use-zoom-in-a-ubco-classroom-resource-guide-1222.html