ZOOM in a UBCO Small Classroom - Quick Start Guide
ZOOM in a UBCO Small Classroom – Quick Start Guide
To see this information in video form, please see "Small Classroom Zoom and Recording Overview"
I - Initial connection of laptop to room projector system
- Use the wall panel to turn on the projector; select the HDMI input.
- Plug the HDMI cable and Room AV USB cable into your laptop
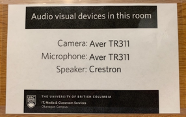
- Each lectern will have a sign listing the room’s equipment. Example:
- Check that your laptop audio is set to use the classroom speakers through the HDMI cable.
- Mac: click on the speaker icon (computer volume button) at the top right of your screen; select the speakers that match the lectern sign.
- PC: click on the speaker icon (computer volume button) at the bottom right of your screen; click on the text in the window that opens and select the speakers that match the lectern sign.
- Start your Zoom Meeting and choose “Connect to computer audio” when the option is shown.
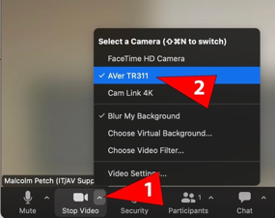
II - Getting Zoom Ready: Select the Camera in Zoom
- Click on the up arrow beside the Stop Video button at the bottom left of the Zoom window 1 .
- Select the camera that matches the lectern equipment sign 2 (Example: AVer TR311).
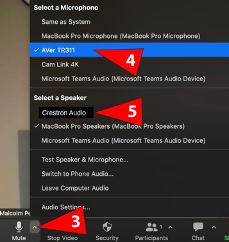
III - Getting Zoom Ready: Select the Audio Setting in Zoom
- Click on the up arrow beside the Mute button at the bottom left of your Zoom window 3 .
- Under Select a Microphone, choose the microphone that matches the lectern equipment sign 4 (Example: AVer TR311).
- Under Select a Speaker, choose the speaker that matches the lectern equipment sign 5 (Example: Crestron Audio).
- If you have students already connected to Zoom, ask them to speak to ensure you can hear them in the room; check that they can hear you, too.
Article ID: 1219
Created On: Mon, Aug 22, 2022 at 3:06 PM
Last Updated On: Tue, Aug 23, 2022 at 8:46 AM
Authored by: Malcolm Petch
Online URL: https://knowit.ok.ubc.ca/article/zoom-in-a-ubco-small-classroom-quick-start-guide-1219.html